This guide explains how to install the MGID pixel on your website, as well as to track the most common events.
Adding MGID Pixel Across Your Website
Firstly, copy the MGID Pixel from the “Conversion sensors” section of the campaign creation tab in your dashboard.
Next, head to your Shopify account. When you log in to Shopify Store, you need to go to "Themes" (under Online Store). Click on "..." (right from the Current theme) & choose "Edit code". /Advertisers/1.%20English%20language%20articles/Shopify/1.png?width=688&height=388&name=1.png)
If you don’t see "Themes" or cannot click on it, please get in touch with the shop owner and ask to provide additional privileges so you can customize live themes.
Open “theme.liquid” in the “Layout” folder, and paste the Mgid pixel at the end of the head tag in “theme.liquid”, after { content_for_header } and before the closing “</head>” tag. Then click the “Save” button in the top-right corner./Advertisers/1.%20English%20language%20articles/Shopify/2.png?width=688&height=410&name=2.png)
Go to the site and confirm that the code is there. You can check if the code is placed with our Chrome extension - MGID Pixel Helper.
Tracking Conversions
Note: You must have prior tech knowledge before proceeding, as you will be implementing changes into the root file of your website. Due to the specifics of the Shopify platform, our Support team is unable to assist with pixel troubleshooting and conversion setup in Shopify.
Here's an example of the three most common conversion points in the purchase funnel:
Note: The suggested event-based conversion names are provided as an example. You can name them as you want, but please make sure the pixel code that you place around the action button reflects this change in name. Otherwise, Shopify and MGID systems won’t sync.
Add to Cart
1. Create an event-based conversion in your MGID Dashboard named “AddToCart” and copy the onclick event pixel code to any text editor.
2. Locate the file in Shopify that contains the button where the “Add to Cart” action takes place. The location will vary depending on your Shopify setup, but the “Add to Cart” button usually can be found in the “product-template.liquid” or “product.template.liquid” file under the “Sections” folder. If you aren’t sure how to locate it, right-click the button on your site to inspect the element, then find the ID or class name.
3. The button will be identified by an “Add to Cart” button tag or input tag. To track this event, add the "onclick" code you created before to the corresponding tag:
onclick='_mgq.push(["MgSensorInvoke", "AddToCart"])'
4. Click the “Save” button in the top-right corner to finish./Advertisers/1.%20English%20language%20articles/Shopify/3.png?width=688&height=393&name=3.png)
Checkout Intent
You can also track when a customer reaches the Checkout section of your site. To do this:
1. Create an event-based conversion named “Checkout” in MGID Dashboard.
2. Locate the file where the check-out button is defined. The location will vary depending on your Shopify setup, but the check-out button can usually be found in the “cart-template.liquid” file under the “Sections” folder. If you aren’t sure how to locate it, right-click on the button on your site to inspect the element, then find the ID or class name.
3. Add the following piece of code within the check-out button tag or input tag in the file:
onclick='_mgq.push(["MgSensorInvoke", "Checkout"])'
4. Click the “Save” button in the top-right corner to finish.
/Advertisers/1.%20English%20language%20articles/Shopify/4.png?width=688&height=391&name=4.png)
Purchase Confirmation
1. To track when a customer successfully completes a purchase and goes to the Order Status page, create a new event-based conversion named “Purchase”.
2. Click “Settings” in the bottom-left corner in Shopify.
/Advertisers/1.%20English%20language%20articles/Shopify/5.png?width=259&height=589&name=5.png)
3. Select “Checkout and accounts” among the Settings options (or find checkout.liquid file).
/Advertisers/1.%20English%20language%20articles/Shopify/6.png?width=688&height=412&name=6.png)
4. Scroll down until you see “Additional scripts.” In that field, first, paste the conditional statements below; this is required to prevent the conversion pixel from firing more than once when a user returns to the order status page.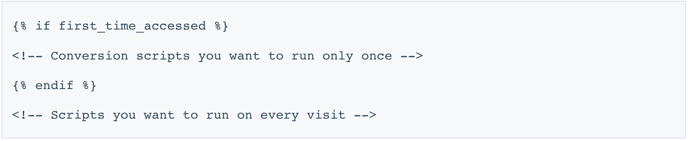
5. Paste the MGID Pixel copied from the “Conversion tracking” tab of your dashboard between “if” and “endif” conditional statements. (where XXXXXX it’s your MGID client ID).
<!-- Mgid Sensor -->

 <script type="text/javascript">
(function() {
var d = document, w = window;
w.MgSensorData = w.MgSensorData || [];
w.MgSensorData.push({
cid:XXXXXX,
lng:"us",
project: "a.mgid.com" });
var l = "a.mgid.com"; var n = d.getElementsByTagName("script")[0];
var s = d.createElement("script");
s.type = "text/javascript";
s.async = true;
var dt = !Date.now?new Date().valueOf():Date.now();
s.src = "https://" + l + "/mgsensor.js?d=" + dt;
n.parentNode.insertBefore(s, n);
})();
</script>

 <!-- /Mgid Sensor -->
6. Finally, underneath the MGID Pixel, add the following event code:
<script>

(window._mgq = window._mgq || []).push(["MgSensorInvoke", "Purchase"])

</script>
7. This is what the “Additional scripts” field should look like with all scripts added:
/Advertisers/1.%20English%20language%20articles/Shopify/7.png?width=688&height=376&name=7.png)
8. Click the “Save” button in the top-right corner to finish.
Note: If you are interested in tracking dynamic values of purchases please follow this instruction https://help.mgid.com/tracking-dynamic-revenue-with-pixel
Verification
To test whether or not the conversion works, install our MGID Pixel Helper extension from the Chrome Store. Event names will appear in the MGID Pixel Helper window if set up correctly. You can also make sure that the pixel fires by going to the Conversions tab in your Dashboard. Test conversion will be shown in brackets.
Related article: MGID Integration with Shopify (via webhooks).