This section will walk you through a complete set up of an under-article MGID widget in Google Ad Manager.
Summary: Current example provides information on how to set up an MGID 3x2 under-article widget with sizes 700x600 (desktop) and 300x1700 (mobile) in a placement unoccupied by other GAM-tags - right under the post.
Before you begin, you will need to ensure you have the specific sizes (mobile/desktop etc.) required for an accurate widget serving on the webpages and the tag codes - all provided by an MGID representative.
Step-by-step setup:
- Creation of an Ad unit in GAM and setting up GAM Tag on the website.
- Setting up Order/Line item for MGID widget.
- Making Creatives
Creation of an Ad unit and setting up GAM Tag on the website. (INVENTORY)
Creating the Ad Unit in GAM
Creation of a new ad unit in GAM can be done in the INVENTORY section. (Note you are about to create a custom fixed size ad unit - no default IAB banner formats can be considered for this setup). In GAM interface go to:
INVENTORY => AD UNIT => NEW AD UNIT
When creating the new ad unit please note the following:
- Make sure the default Parent ad unit is set to Top level
- Name of the ad unit - can be any name that falls in 255 characters.
- Code - has a limit on which symbols can be used (i.e. no spaces).
- Sizes - this part of the ad unit is crucial. MGID native widgets require fixed sizes to be set for the GAM implementation.
- Sizes optional - please fill in the specific sizes provided by the MGID representative. In this case we have a widget that will appear both for desktop and mobile, therefore 2 sizes need to be mentioned.
- You can leave all other optional settings as they are. Click “Save”.

Setting GAM tag on the Website
The previously created Ad unit has its own unique tag that can be retracted from GAM interface. Go to:
INVENTORY => AD UNIT => Search field (enter the NAME of your ad unit) => Click on an Ad unit name in the list

Retracting the GAM tag:
- Click on the Tags tab
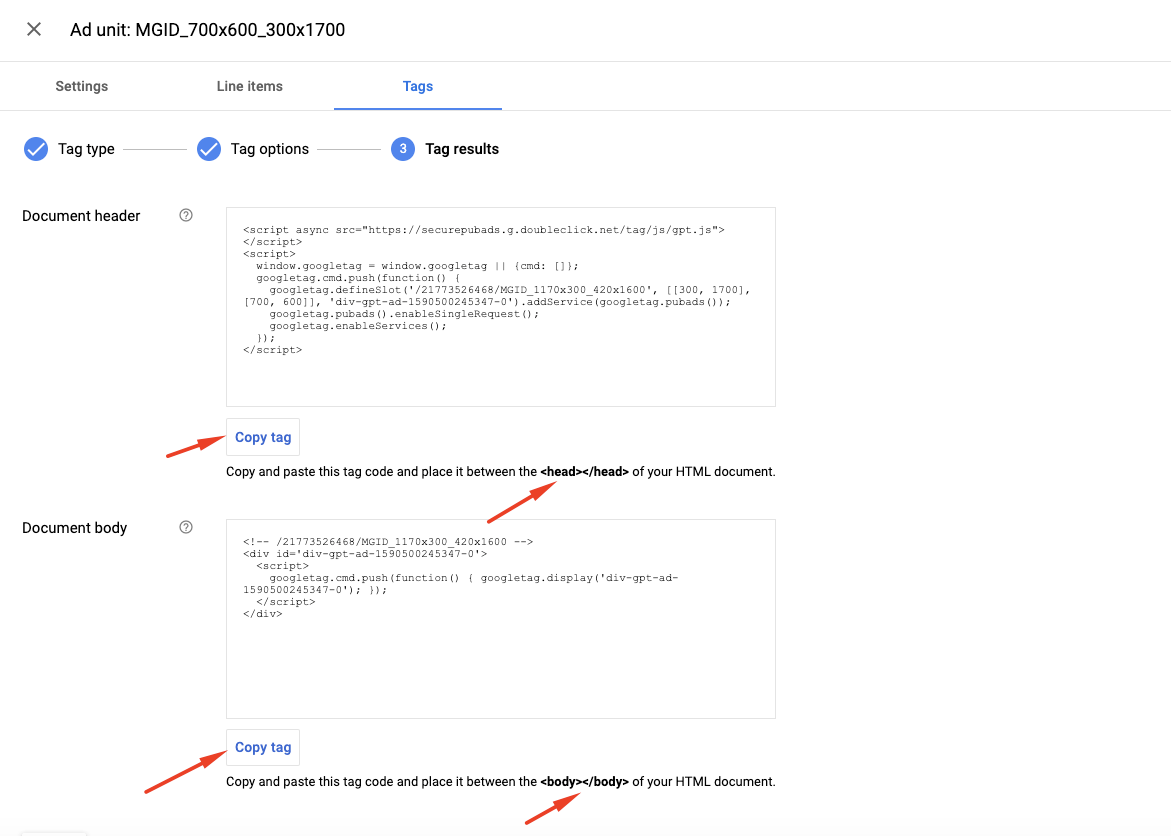
- Follow the Step-by Step instruction. Additional settings are NOT needed unless agreed with the MGID representative beforehand. Click Continue till you get to the Tag results
- In Tag results please copy-paste (hardcode) the Header and Body codes according to the instruction into your website’s pages. Body must be set where the actual MGID widget should appear.
- In case you require the widget to run on AMP pages you will need to generate a different GAM tag. Please chose in Tag type section the option AMP tag, all other Step-by Step settings are the same as for a default GAM tag. In the Tag results section there will be only one Body code that must be copy-paste (hardcode) where the actual MGID widget should appear on the page.
Setting up Order/Line item for MGID widget. (DELIVERY)
Creating Order/Line Item for MGID
Creation of a new Order/Line Item can be done in the DELIVERY section of GAM. Please go to
DELIVERY => ORDER => NEW ORDER

Creating new Order:
- Fill in the required General settings - Name and Advertiser (can be either one from the list or choose Ad New Company and follow the step-by-step instruction.
- You can leave all other optional settings as they are. Click “Ad Line Item” (preferred) or “Save”.
The previously created Order can be found in the GAM interface. Go to:
DELIVERY => ORDER => Search field (enter the NAME of the Order) => Click on Order in the list
Creating Line Item for the Order:
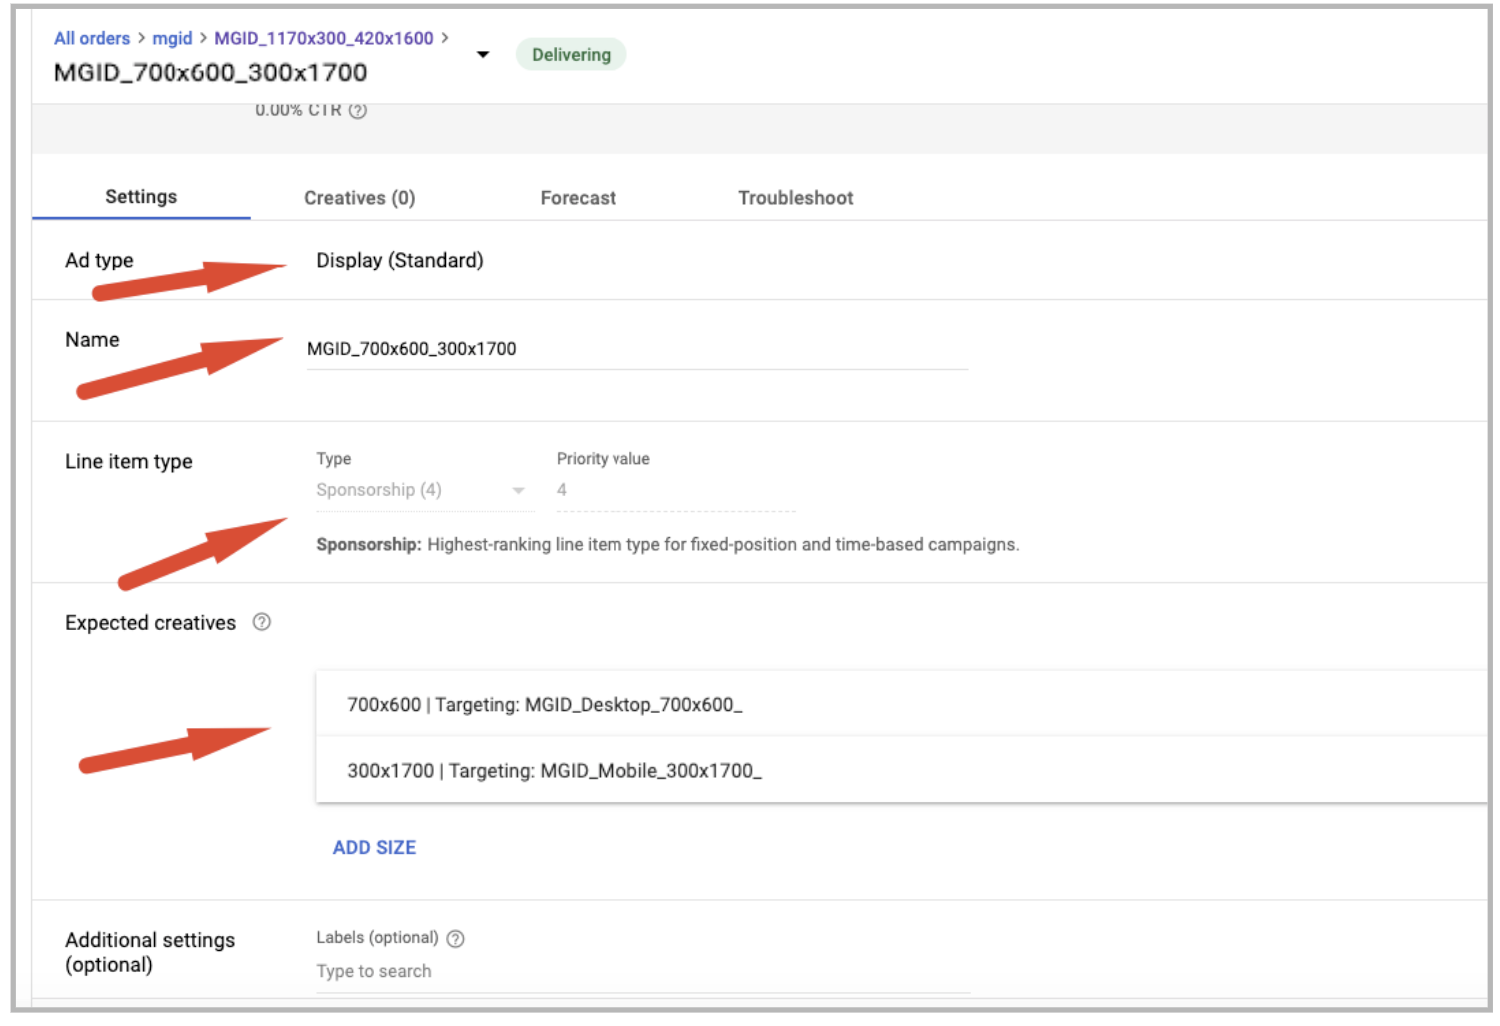
- When setting a new line item we have two Ad type options: Display and Video. Please select Display.
- Name - set the name for the new line item
- Choose the Priority - for the current setup we recommend selecting Sponsorship (4)
- Expected creatives - should be EXACTLY THE SAME as set for the Ad unit previously created. In order to make sure the correct sizes appear for the correct layout you can use Creative targeting (optional).
- Delivery settings - are responsible for setting specific traffic volumes and rates GAM will provide for the Line item.
- In order for the ads to serve as soon as possible please choose Immediately in the Start time field. As for the End time field please set the date you wish GAM to pause ads from being served on your website.
- According to the chosen priority type, MGID widgets can be set to receive either specific volumes or as much traffic as possible during the cooperation. In order to avoid discrepancies we suggest setting a Goal 100% of total impressions.
- Add targeting - is responsible for where we want the line item to appear (ad units, GEOs, devices etc.) This section is responsible for linking our previously created ad unit to the current line item. In order to make a direct link we select. Please choose Inventory and in the section Ad units choose the previously created ad unit

- You can leave all other optional settings as they are. Click “Save”.
After the Line item is set all that is left is to set specific ads that need to be linked to the line item. We will need to set Creatives for this line item.
Setting Creatives
Making a new Creative can be done in the existing line item options. Go to:
LINE ITEM => Creatives (0) => Add Creative (Or New Creative)

Setting up Creatives:
- After clicking Add Creative and choosing the right size you need choose the Third Party

- Name - set the Name of the Creative. Choose code type - Standard
- In the script field - insert the MGID’s widget code provided by our representative.
- You can leave all other optional settings as they are. Click “Save” Note, if you are using 1x1 sizes for your ad unit, line item and creative setup - please uncheck the option Serve into SafeFrame.
- Please note, the example shows the setup for the creative meant for desktop size, same steps should be applied to set a creative for the mobile size mentioned in this example.

Please make sure your Lineitem has the Status Ready or Delivering
In case you have Draft or other status the ads may not be serving on the webpage. You need to Activate the Order. For more details please follow the instructions from the official GAM Help guides.
After 10-30 minutes MGID widget should start showing ads on the website.